Showing posts with label Quick. Show all posts

Thursday, February 16, 2012

Crispy Oven Fish

My husband only likes his fish fried and I only like my fish pan fried, so when I found this recipe that was really light and very delicious I had to jump on it.  I have changed it from the original a little and I can't even remember where I found it, but I love it.  My kids just mainly like the fact that there are chips involved. 

When shopping for a good fish for this recipe, I mainly look for a white flesh and I try to find the thickest fillet I can.  This does work great with tilapia, or catfish which are fairly inexpensive, but I like a good piece of swordfish every now and then. 

  • 2 1/2 c crushed potato chips (I use Lays)
  • 1/2 c grated parmesan cheese
  • 2 Tbsp chopped parsley (I sometimes use dried parsley because it's mainly for color)
  • 1/2 c mayonnaise or salad dressing
  • 4 Tbsp lemon juice (3 lemons)
  • 1 lb fish fillets, fresh

1.  Preheat oven to 400 degrees.

2.  Combine chips, cheese and parsley on a plate, or a dish with sides.  Add salt and pepper to taste.  In a small bowl combine mayonnaise, and 2 Tbsp lemon juice. 

3.  Dip fish in remaining 2 Tbsp lemon juice, then mayonnaise mixture, then cover in chip mixture. 

4.  Arrange fish in oiled baking dish.  Bake in the oven for 5-10 minutes or until fish flakes with a fork.  *The fatter the fillet, the longer the cooking time will be.  Serve with a green vegetable and some fluffy rice...YUM!  ENJOY!!

Monday, February 13, 2012

Fresh Seafood Pasta

This is not a recipe that I make very often because of the expensive ingredients, but it does make a lot of pasta so, if there are people coming over for dinner, or it's a special occasion, it's a good choice.  This is also a really easy way to look like you know how to cook fancy.  Feel free to mix up the seafood choices if you can't find some of these items in your supermarket.  This would even be good with some cooked salmon.

  • 2 Tbsp olive oil
  • 1/2 c shallot, minced
  • 2 tsp garlic, chopped
  • kosher salt/pepper
  • 2 c tomatoes, peeled, seeded and chopped
  • 1 lbs fresh mussels, scrubbed (you can buy canned if you don't want the hassle)
  • 1 lbs medium shrimp
  • 2 c dry white wine
  • 1 lbs lump crab meat, cleaned
  • 1/2 c chopped green onion
  • 1 lbs penne pasta, cooked
  • 4 oz grated Parmesan cheese
  • 1/4 c chiffonade fresh basil
  • white truffle oil

1 In a large saute pan eat the oil.  Add the shallots and garlic and saute about 2 minute on low heat.  Season with salt and pepper.  Add the tomatoes and saute for 1 minute.  Add the mussels and shrimp and season again with salt and pepper.  Let this saute for 2 minutes.

2.  Add the wine and scrape all the bits ff the bottom of the pan.  Bring this to a simmer and cover; cook until shells open, about 4 to 6 minutes.  Add the crab meat and green onions and saute for 1 minute.  Add the pasta, toss and combine cooking until the pasta is heated through, about 7 minutes. 

3.  Toss the pasta with the cheese and basil.  Spoon onto a large serving plate and drizzle with just a little truffle oil.  ENJOY!!

Tuesday, January 17, 2012

BLT Cobb Salad

I'm back!!  I went on a little hiatus over the holiday mainly because with the kids all being home I didn't have a lot of time to write.  Plus, with the busy schedules comes eating out a lot and not so much cooking.  I have decided to start off easy this first post with a salad.  I know some of you may not think of salad as a main dish, but if it's served at our house, it usually is.  This is my husband's favorite salad and I can get the kids to eat most of it, so it's a real winner. 

A few things first...  Normally, and in this case, a salad is about cutting things up and throwing them on top of lettuce.  This salad does, however, have one ingredient that, for some people, is a little difficult.  So, I want to show you how I tackle it:

The one ingredient I am referring to is the avocado.  There are a lot of tools out there now for this little green fruit, but I like to stick with the basics...a knife and a spoon.  First, you take the avocado and turn it upright where the smaller end is pointing up.  Then take your knife and slice the avocado in half turning it all the way around the seed. 


Now, take the knife out and hold the avocado like you would a football with the cut part in between your thumbs and twist in opposite directions.  This should release one side of your avocado from the seed so you will now have two pieces. 

Next, it's time to take out the seed.  This can be very dangerous, so please be careful.  I like to hold the avocado half in a folded up towel, so if my knife should slip it hits that first and not me. 

Now, hold the avocado, seed up, in the hand you are not using the knife with.  Take the knife and press down with gentle force to cut slightly into the seed.  Then, give it a little twist and it should slide right out.  The more ripe your avocado, the simpler this should be, so if you are nervous, don't buy a hard avocado.  Also, if you don't want to try this use one of those tools I told you about. 


Lastly, still holding that avocado, take your knife and make a criss-cross pattern into the fruit.  Then, take that spoon I was talking about and scoop out the meat of the avocado.  Finished! 


Let's get on to the recipe:

  • 2 1/2-3 c lettuce (this can be heads of lettuce cut up, or the bagged stuff)
  • 2 Tbsp. balsamic vinegar
  • 1/4 c crumbed blue cheese
  • 2 tomatoes, chopped
  • 1 cucumber, chopped
  • 1/2 package bacon, cooked and crumbled
  • 1 bunch scallions, sliced thin
  • 1/2 c shredded chicken
  • 1/2 c frozen corn kernels, defrosted
  • 1 avocado, chopped

1.  Lay out the lettuce on a serving plate, or in a big salad bowl.  Pour the balsamic over the lettuce and mix it all together. 


2.  With each ingredient, lay them carefully side by side on top of the lettuce. 


3.  Serve just like this with any salad dressing of your choice.  In my house, we like to use Ranch.  ENJOY!!

Wednesday, November 23, 2011

Fish Tacos

I know, I know, I have been slacking big time!  I am going to try to give you three recipes in one day.  If I only get to two please don't stone me.  When the kids get up from their nap I have to go. 

My first recipe is for Fish Tacos.  At my house we eat Tex-Mex at least once a week!  We try to do Taco Tuesday (We eat tacos in our jamas in front of a movie) every week, but I often get bored with the same beef tacos over and over again.  So, sometimes it is Enchilada Tuesday, or Fajita Tuesday, but I always keep it close to the theme.  This recipe is very simple...almost too simple to blog, but I wanted to get it out there anyway.  I find that you really can use any type of fish you like as long it is white and flaky.  Meatier fish like salmon and tuna will have a different mouth feel and flavor.  Also, this meal is pretty inexpensive if you stay along the lines of tilapia or even catfish.  Let's get started...

Ingredients:
  • 1 1/2 lbs. boneless, skinless white fish (I used tilapia)
  • 1 Tbsp Cajun seasoning
  • 2 Tbsp olive oil
  • 8 corn tortillas
  • 1 c. shredded cabbage
  • 1/2 c. chopped tomatoes
  • 1 lime (in wedges)
  • handful cilantro
  • 2 green onions (sliced thin)
  • 4 oz. sour cream
  • 4 oz. cilantro ranch (recipe follows)
1.  Pat the fish dry with a paper towel.  Season with the Cajun seasoning.  In a hot skillet over the stove add the olive oil and cook the fish until opaque all the way through (about 3 min per side).  Remove the fish from the pan and let it rest on a plate in a warm spot. 

Assorted Toppings


2.  While cooking the fish, wrap the tortillas in foil and let them sit in a 200 degree oven to get warm.  When the fish is finished separate it among each tortilla and use any combination of the toppings you would like.  ENJOY!!

YUMMM!!!
Cilantro Ranch:
  • 3 oz. ranch
  • handful cilantro
  • 1/2 lime (juiced)
  • Kosher salt and pepper
1.  In a food processor, or blender combine all ingredients.  Cover the mixture with lid and turn it on!  Blend until nice and smooth.  If there is not enough liquid to make it a sauce you can add a little more lime, or even some water.  (Just enough to loosen it up.)  Taste mixture often to help with the seasonings.  ENJOY!!

Wednesday, October 19, 2011

Beef Pasta

This is my version of a deconstructed Hamburger Helper.  I like to make this when it starts getting a little cooler outside.  Since I usually keep all these ingredients (except ground beef) in my pantry, this is a really inexpensive meal for us.  Let's get started...

Ingredients
  • 1/2 small onion (chopped)
  • 1 lb ground beef (turkey or pork could be substituted)
  • 1/4 c red wine
  • 1 packet onion soup mix
  • 1 c water
  • 1 Roma tomato (chopped)
  • 4 chopped scallions
  • 4 c cooked pasta (about 1 1/2 c raw)
1.  Saute the ground beef in a large skillet until browned and cooked through.  Break up the meat with a wooden spoon as you go.  This should take about 5 minutes on medium heat.  Throw in the onion and saute until translucent, about 3-4 minutes. 


2.  Deglaze the pan with the red wine and scrape all the good bits off the bottom of the pan.  Then add the soup mix and the water and mix well to get all the lumps out.  Bring to a boil and then simmer for 5 minutes until the sauce thickens.


3.  Taste the sauce and season with salt and pepper if needed.  The soup mix is condensed and pretty salty, so you probably won't need it.


4.  Turn off the heat and add the tomatoes and scallions.  If you would like to cook these ingredients it's up to you, but I like freshness of them being just heated through.


5.  Pour the meat sauce over some cooked noodles and serve with a nice salad and some garlic bread.  ENJOY!!

Wednesday, October 12, 2011

Slop, Slop, Sloppy Joes!!

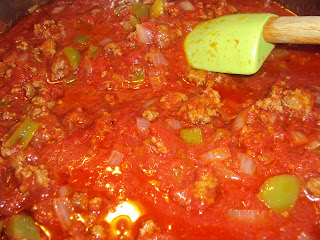
We have sloppy joes a lot in our house.  The kids eat them up and I think I make them pretty healthy compared to some pre-packaged brands.  Now, we do eat them a little differently then one would think.  Instead of sandwiching the wonderful meat mixture in between two hamburger buns we pile it high on soft white bread and top it with shredded cheese.  Quick note, my daughter does not like onions or bell pepper and she has never even noticed they are in this recipe.

Let's get started...

Ingredients
  • 1 lb. ground beef (you can also use pork or turkey if you prefer)
  • 1 small white onion (coarsely chopped)
  • 1 med bell pepper (seeds removed, chopped)
  • 1-28 oz. can crushed tomatoes
  • 1 Tbsp. steak seasoning (I use Harley's)
  • 2 Tbsp Worcestershire sauce
  • kosher salt
  • black pepper
  • white bread
  • shredded cheddar cheese
Note: I don't use any oil in this recipe because the meat should give off enough.  If you are using turkey, or a very lean beef you might want to lightly coat the bottom of the pan with some oil before step #2.


1.  Brown the meat in a hot saute pan.  I use a deep dish saute pan so I can finish the entire meal in it.  Break the meat up with a wooden spoon (can also be plastic) so the meat cooks quickly and evenly.  Using a slotted spoon drain the meat onto a plate covered with a paper towel.  This allows some of the grease to drain a little.

2.  In the same pan the meat was just in add the onion and bell pepper and sweat a little, about 5 min.  Real quick...an easy way that I like to chop bell peppers is to cut around the middle seed pods.  This way I don't have to use my hands to pull seeds out and cleanup is a lot easier.


3.  Add the meat back into the pan with the onion and peppers and heat up a little.  Add the next three ingredients and let simmer for a while...about 5 min.  Now is time to taste!  I would recommend adding a small amount of salt and pepper before and then just check for seasoning. 


4.  Here I usually cover the pan and let it simmer for about 15 min.  Just like a good soup, or stew this helps the ingredients to marry together. 

5.  Now the fun part!!  Place one piece (or two like my husband) of white bread down on your plate.  Smother the bread with at least two spoonfuls of the sloppy joe mixture.  Top with shredded cheese. 


**As you can see from the finished product we like to enjoy our meal with some yummy green beans (out of the can, of course).  ENJOY!!